Using Dependencies in VISr
tutorialWhen creating and using visual and interactive syntax extensions with VISr, you have access to the entire catalog of JavaScript (including WebAssembly and TypeScript) libraries found on NPM. This means your interactive-syntax extensions can use the wide range of existing code, from network layout to advanced cad libraries.
This post is a tutorial on how to add, and use, JavaScript dependencies to your code. It shows you how to convert an NPM package for elIDE, the predominant VISr IDE. Additionally, this post points you to a directory of pre-existing packages. By the end of this tutorial, you will have created a small extension that stores tree-literals in your code.
If you are new to VISr or elIDE, I recommend you follow this introduction tutorial first. It covers the basics of how to add interactive-syntax extensions to your code, as well as how to create a simple counter extension. You can also watch this video to learn about the basics of visual and interactive syntax in general.
The Basics #
First thing first, you can find a list of the current set of available dependencies by going to the VISr dependency page:
These are all bundles from NPM that have been pre-packaged for elIDE. Later in this tutorial we will cover how to package new bundles. For now though, we will install dependencies from this list.
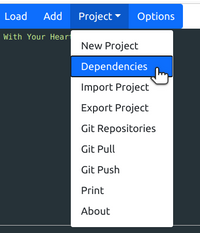
Adding Dependencies to elIDE #
The dependency manager can be found in the Project menu:
When opened, you will be greeted with a window like this:
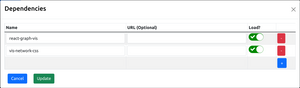
This is a list of all of the dependencies in your current project. New
dependencies can be added with the + button, and unneeded dependencies can be
removed with the - button.
The Name field is what you will require in your code, while the URL field
instructs elIDE where to fetch the dependency from. If no URL is provided, then
a URL is referred from the dependency list at https://deps.visr.pl.
The Load? option tells elIDE if it should load the dependency when running the
program. Generally this option should be left on. The only time to turn it off
is when adding packages that contain only data and no executable code. At the
time of writing this, only one package fits this description:
opencascade.wasm.
For this tutorial we will need two packages: react-graph-vis and
vis-network-css. Once you hav added those packages press Update, and elIDE
will download those packages into your project.
Using in Code #
With these dependencies added, you can now refer to them as you would any ClojureScript module:
(ns tree.core
  (:require [react-graph-vis]))
This means you also have full access to the :as and :refer keywords as well.
Do note, however, that many JavaScript modules provide a default export. Unfortunately, those can't be accessed directly through this mechanism. Rather, you can simply access it as a field from your required module:
(def Graph (.-default react-graph-vis))Here, Graph comes from the Vis.js Network Library. We can now
construct our VISr as normal:
;; A Node is one of:
;;   - {:left Node :right Node :label String}
;;   - {:label String}

;; A Tree is: {:root Node}

(defvisr Tree
  (state root {})
  (elaborate-fn [this]
    root)
  (render [this]
   [:> Graph
    {:options {:layout {:hierarchical {:sortMethod "directed"}}}
     :graph (convert-tree @root)}]))
For this tutorial, the elaborator is nothing special, it just returns the tree
as a run-time data structure. The renderer is a little more complicated, but
offloads most of the work to a convert-tree helper:
(defn convert-tree [{label :label
                     {l-label :label :as left} :left
                     {r-label :label :as right} :right}]
  (if (and left right)
    (let [{l-nodes :nodes l-edges :edges} (convert-tree left)
          {r-nodes :nodes r-edges :edges} (convert-tree right)]
      {:nodes (concat l-nodes r-nodes #{{:id label :label label}})
       :edges (concat l-edges r-edges #{{:from label :to l-label}
                                        {:from label :to r-label}})})
    {:nodes #{{:id label :label label}}}))
This helper can be used to draw the tree at both during edit time, and run time.
For example, here is a tree with a root node A, and two leaf nodes x, and y:
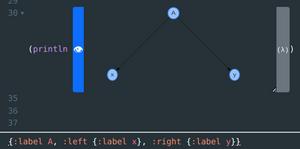
The astute reader may have noticed that while this project uses
vis-network-css, its not actually used in the code. Instead, it is used by
react-graph-vis as a peer dependency. Removing it from the dependency list
causes the tree to render improperly.
Packaging New Dependencies #
Using pre-packaged dependencies is useful, but the entire catalog of existing, and future, JavaScript libraries is much bigger. Thus it is useful to know how to bundle nwe packages for elIDE. If you do create a package, feel free to submit a pull request to add it the official dependency repository.
As of right now, you can not create new elIDE packages from within elIDE.[1] You will need to install three packages:
You can download them seperately, or you can get them through your package manger, such as Homebrew for Linux or macOS:
$ brew install node
$ brew install npm
$ brew install racket
You will also need the sml package from the Racket repository:
$ raco pkg install smlFinally, you will need the scripts/shop folder from the [VISr][visr-source]
repository:
$ git clone https://github.com/LeifAndersen/interactive-syntax-clojure
$ cd interactive-syntax-clojure/scripts/shop
In this folder, you'll notice two important files, database.sml and
build.rkt. The former contains the requiremets to build each package, while
the latter contains the build script itself. Enteries in database.sml consist
of the package name, a corrosponding NPM package, and a javascript path within
that package. For example, the entry for react-graph-vis is:
$ cat database.sml
[...]
react-graph-vis:
{package: "react-graph-vis" path: "lib/index.js"}
[...]
You won't need to modify the contents of build.rkt, but you will need to add
your package to database.sml. Once you have added the entry into the database, you can now build the dependency with build.rkt:
$ racket build.rkt -v react-graph-visOnce built, you will find the dependency in the newly created deps folder.
$ ls deps/
react-graph-vis.js
react-graph-vis.js.LICENSE.txt
The first file is the dependency itself, while the second file contains all of the licenses of the libraries used to create that dependency.
Wrapping Up #
And that's it. Now you know how to add dependencies to your projects, how to use those dependencies when creating interactive-syntax extensions, and how to package new JavaScript libraries into dependencies.
Of course, this entire ecosystem is still under active development. We are always interested in conributors, from simple additions to the dependency directory, to a complete rework of the how dependencies are built. At the end of the day, what counts is all of the cool things we can build using visual and interactive-syntax extensions.
This is not by design. I simply haven't figured out how to run Webpack, the crutial component, from within a web browser. If you know how to do this, please get in contact with me! ↩︎